让 VAGRANT 启动并运行起来
This is a quick getting started tutorial for Vagrant to help you get your foot in the door. The official documentation is fantastic at getting you started as well, but this article is geared more towards the absolute beginner and will cut directly to the chase on certain things. This in no way is a replacement for referencing their documentation, and I encourage anyone who reads this to immediately read the docs after. So, with that being said, read this article if:
Heads Up! If you’re looking for a tutorial on configuring Vagrant with Chef or Puppet, this article isn’t for you. This article also expects you to have a basic understanding of the command line and Git. Lastly, the instructions here are for Mac users, but it should be very similar for both PC and Linux users. | 译者信息 这是一个帮助你快速入门Vagrant的初级教程。官方文档也可以很好的帮助你入门,但是本文更针对完全零基础的初学者并且会对某些问题直接切入正题。 本文在任何方面都不会取代官方文档,而且我建议读完本文的人马上阅读官方文档。因此,如果你符合以下条件即可阅读本文:
注意! 如果你在寻找一个在Chef或者是Puppet中配置Vagrant的教程,本文并不适合你。本文也希望读者对命令行和git有基本的理解。最后,本文是针对Mac用户的,但是对PC用户和Linux用户也基本相同。 |
Vagrant is a tool to “Create and configure lightweight, reproducible, and portable development environments.” In laymen terms, this means Vagrant takes all the headache out of setting up a local development environment and replaces it with almost a single config file where you can pick and choose what features you want your server to have. No longer are you stuck using XAMMP, configuring virtual environments manually, or working remotely in your editor via FTP. Vagrant is super powerful, and it is a lot more extensive than what this article will cover or where my understanding goes. This article will cover some pretty cool things with Vagrant, such as:
| 译者信息 Vagrant 是一个可创建轻量级、高复用性和便于移植的开发环境的工具。 在非专业人士眼里,这意味着Vagrant抛弃开发环境中所有让人头痛的设置代之为了一个单一的配置文件,你可以选择你的服务器所需要的特性予以保留。你将不会再被XAMMP,手动配置虚拟环境,或者使用FTP远程编辑所卡住。 Vagrant 是一个强有力的工具,它的功能和价值超出这篇文章所覆盖的范围以及我的理解所能到达之处。这篇文章将介绍Vagrant中一些相当酷的事情,比如:
|
What is Vagrant and why should I even care?Simple Reason:Developing locally rocks. Vagrant is quick, easy, and helps you manage multiple development environments at one time. Long Reason:Imagine you’re developing an app with a team of say 15 people. This app is crazy awesome! It uses the Laravel PHP Framework, Redis and Memcached, Imagemagick and GD PHP Modules, curl, MySQL, PostgreSQL, and even MongoDB. On top of this, Laravel has the specific requirements of needing PHP version 5.3.7 or higher and the MCrypt PHP Extension. Ideally, you’re going to want all 15 people on the team working on this app to have as identical development environemts. Not all the developers on the team are going to have the expertise of Sysops or being a System Admin. Getting the development environments identically setup can be a huge undertaking. On top of that, some people use Mac while others Use Linux or Windows. Before you know it, developers will be throwing computers through walls exhausted from constantly configuring and configuring. | 译者信息什么是Vagrant和为何我要甚为关注?简单的原因:在本地开发爽。用Vagrant快,简单,并可帮助你同时管理多个开发环境。 更长的原因:想象一下,你正在和据说15人的团队开发一个应用程序。这个程序真是狂棒!它使用Laravel的PHP框架,Redis和Memcached,ImageMagick和GD的PHP模块,curl,MySQL和PostgreSQL, 甚至MongoDB。 另外,Laravel明确依赖PHP版本5.3.7或更高版本,以及mcrypt的PHP扩展。 理想情况下,你会希望团队所有的15人在开发这个应用程序时,都是相同的开发环境。 但是不是所有的开发团队,都有系统管理的专家或者培养一个系统管理。获得相同设置的开发环境可能是一个非常艰巨的任务。 最重要的是,有些人使用的是Mac,而其他人则使用Linux或Windows。在它之前,开发人员会纠结在无尽的配置中,用电脑扔墙而筋疲力尽。 |
Vagrant manages all this for you so everyone can focus on coding rather than maintaining their development environement. Then, let’s say half-way through the project, it’s discovered that you need Beanstalkd installed on the server to start processing queues. Normally, everyone on the team will have to reconfigure their environments to use Beanstalkd hoping that it works. With Vagrant, you’ll push an update to the configuration file, and everyone will just need to reload their Vagrant boxes. Boom! Everyone can now start implementing queues in their code. It doesn’t matter if they’re on Windows, Linux, or a Mac, everyone’s development environment remains identical. | 译者信息 Vagrant将会替你管理好环境设置的种种,让你将精力用在业务代码的开发. 再来看一个场景,项目开发了一大半了发现需要安装Beanstalkd以便处理队列问题. 通常情况下,大家会停下来重新配置环境并期望 Bean stalkd能正常运行. 有了Vagrant, 只需要将更新文件推送到配置文件上即可, 所有人只需要刷新 Vagrant就行了.太棒了!接下来大家就能使用队列功能了. 这跟操作系统更没什么关系,不管是 Windows, Linux, 或是Mac,因为大家的操作环境都是一样的. |
Providers and ProvisionersWhen I reference that Vagrant manages all of this for you, that’s not completely true. Vagrant works with “Providers” and “Provisioners” to help create these development environments. Providers, such as VirtualBox, VMWare, Amazon AWS, and Digital Ocean, are the services where your virtual environment will be created and hosted. If it be just on your local machine with VirtualBox or VMWare, or alternatively, if it be with Amazon or Digital Ocean to quickly deploy these virtual environments into the cloud. | 译者信息服务提供者和服务消费者我提到了Vargrant会帮你打点环境配置的一切问题,这不能以偏概全. Vagrant工作需要服务提供者和消费者的配合来管理环境配置. 提供者, 像是 VirtualBox, VMWare, Amazon AWS, 和Digital Ocean, 就是你的虚拟环境的宿主.假设这些环境是 VirtualBox 或VMWare, 又或者是, Amazon亦或Digital Ocean都能方便的部署环境到云端. |
Provisioners are tools that allow you to quickly configure your server to your exact requirements. These are great to use because they automate the sometimes daunting process of setting up a server through configuration before the server is even created. You can configure nearly everything to be installed on the server. Some examples are PHP, PHP Modules, Apache, Git, Vim, databases, logins, Xdebug, etc. The two most common provisioners used with Vagrant are Puppet and Chef. The provisioners are really neat to use because when you need to build your staging or production environments, you can use these exact same blue prints to ensure you have perfectly synced environments between development, staging, and production. | 译者信息 供应者 Provisioners 就是一些帮助你实现环境具体配置的工具软件. 这在管理繁琐的服务器配置方面发挥巨大作用. 有关服务器的配置基本都能被管理起来. 比如说 PHP, PHP Modules, Apache, Git, Vim, databases, logins, Xdebug, 等等. Vagrant最常使用的消费者是 Puppet 和Chef. 使用消费者管理环境配置的优势就是,在以后的环境配置时都可以使用先前的配置模板,不论是部署,发布和生产过程中都可以方面的使用起来. |
Enough! Let’s get a LAMP stack up and runningThis is a step-by-step guide on setting up Vagrant on your Mac. I find that I get incompatibility errors sometimes based on the combined OS, Vagrant version, Chef versions, and even the virtual box version. I am in no way an expert, so these errors might be a lot more minor and fixable than I make them out to be. This also may seem like a lot of points for failure, but when it all works together it is absolutely astounding. Plus, Vagrant support is fantastic and their developers (beast developer?) push fixes and updates all the time. I suggest being exceptionally cautious when upgrading any of the moving parts with Vagrant, especially after you have it working perfectly for you or your organization’s purpose. Your development environment is your baby! | 译者信息好了! 开始使用LAMP下面将分步介绍在Mac上使用Vagrant 。我发现在在使用不同的OS, Vagrant 版本, Chef 版本, 以及virtual box 版本时会出现一些报错.这方面我也不是专家,也没办法解答所有的报错问题. 也许看起来每个问题都会等导致使用的失败,但奇怪的是所有组件合起来后却能正确的运行. 另外, Vagrant support 确实提供了坚强的后盾,开发团队 (beast developer?) 也在高频率的发布补丁版本.我建议在使用Vagrant时不要轻易升级软件,尤其是之前已经很顺畅的运行在你们系统上的 . 开发环境就像是你的孩子一样,不管有多么不尽人意都得接受! |
Install Necessary DependenciesNote: When this was written, I was currently using Vagrant version 1.4, VirtualBox 4.3.4, and Ruby 1.9 on Mac OS X Mavericks 10.9. After Vagrant is installed, pop open your terminal to verify it’s installed. You can do this simply by typing this in your terminal: vagrant -v The Vagrant installer should automatically add Vagrant to your system’s PATH. You should see something similar to the image below and Vagrant is now successfully installed on your system. Earlier we discussed the Chef provisioner. The example we’re going through will use that instead of Puppet. There is a tool called Berkshelf that helps manage Chef’s cookbooks (PHP, PHP Modules, Apache, Git, Vim, databases, logins, Xdebug, etc.). The example also uses this. Vagrant or Chef don’t require Berkshelf, but it’s nice to have in case the Vagrant instance you use or build will take advantage of it. You can install it with the following command on Mac: gem install berkshelf | 译者信息安装插件Note: 写这篇文章时 Vagrant版本是1.4, VirtualBox版本 4.3.4, Ruby版本 1.9 Mac OS X Mavericks 10.9. Vagrant安装后,系统会弹出控制台窗口来验证. 可以直接键入下面命令: vagrant -v Vagrant安装程序会自动添加相关路径到 PATH. 安装成功后,你会看到下面类似的图片. 之前说到过 Chef 消费者. 这里我们就是用Chef来替代 Puppet. 有个工具 Berkshelf用来管理 Chef’s 的组件(PHP, PHP Modules, Apache, Git, Vim, databases, logins, Xdebug, 等等.).本例中也是如此. Vagrant 或是Chef 并不一定要安装 Berkshelf, 但最好安装一下,以便后面Vagrant需要使用. 在 Mac上安装使用下面命令: gem install berkshelf |
Install Useful Vagrant PluginsThe plugins we will be installing are Vagrant Berkshelf, Vagrant Hostmanager, and Vagrant Omnibus. The Vagrant Berkshelf plugin allows Vagrant to communicate with the Berkshelf cookbook manager we just installed. The Vagrant Hostmanager plugin lets you add a configuration to Vagrant to automatically update your hostfile and point it to the IP in use. I really enjoy this plugin because it allows you to develop on a pretty URL such as “http://myproject.local” versus “172.22.22.22″ or the IP in use. The Vagrant Omnibus plugin ensures the desired version of Chef is installed. The example we will be using doesn’t use this, but I find this plugin super useful for debugging when Chef related issues come up. I believe something like this might be baked right into Vagrant core one day. Installing Vagrant plugins is a breeze once Vagrant is installed. In your terminal simply type: vagrant plugin install vagrant-berkshelf vagrant plugin install vagrant-hostmanager vagrant plugin install vagrant-omnibus | 译者信息安装Vagrant 插件需要安装的插件如下 Vagrant Berkshelf, Vagrant Hostmanager, 和Vagrant Omnibus. Vagrant Berkshelf 插件可以实现和 Berkshelf cookbook manager 的通信. Vagrant Hostmanager插件可以自动更新绑定IP的配置文件. 我个人很喜欢这个插件,它使得开发过程更清晰 ,URL像是 “http://myproject.local” 比直接使用IP“172.22.22.22″ 好得多. Vagrant Omnibus插件检查Chef 安装版本是否匹配. 本例中没用到这个插件,但在排查Chef相关问题时,这个插件非常有用.我相信有天这个功能会被直接添加到Vagrant核心模块里. 安装Vagrant插件十分简单,在控制台直接输入命令即可: vagrant plugin install vagrant-berkshelf vagrant plugin install vagrant-hostmanager vagrant plugin install vagrant-omnibus |
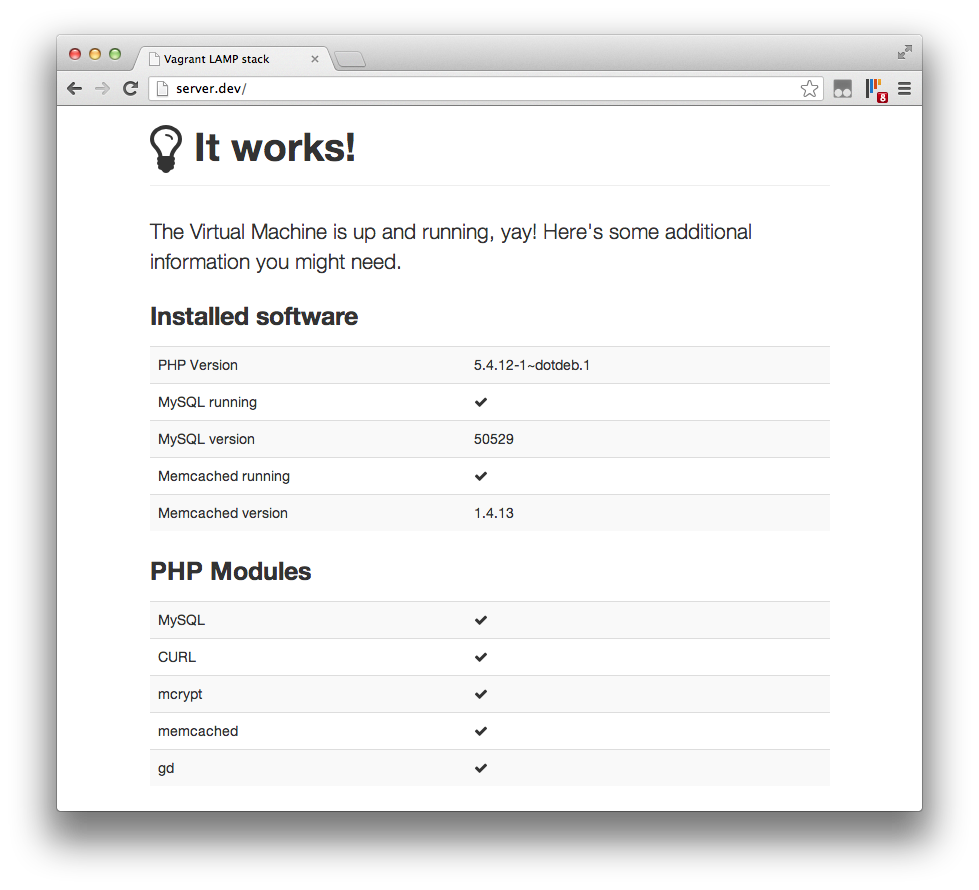
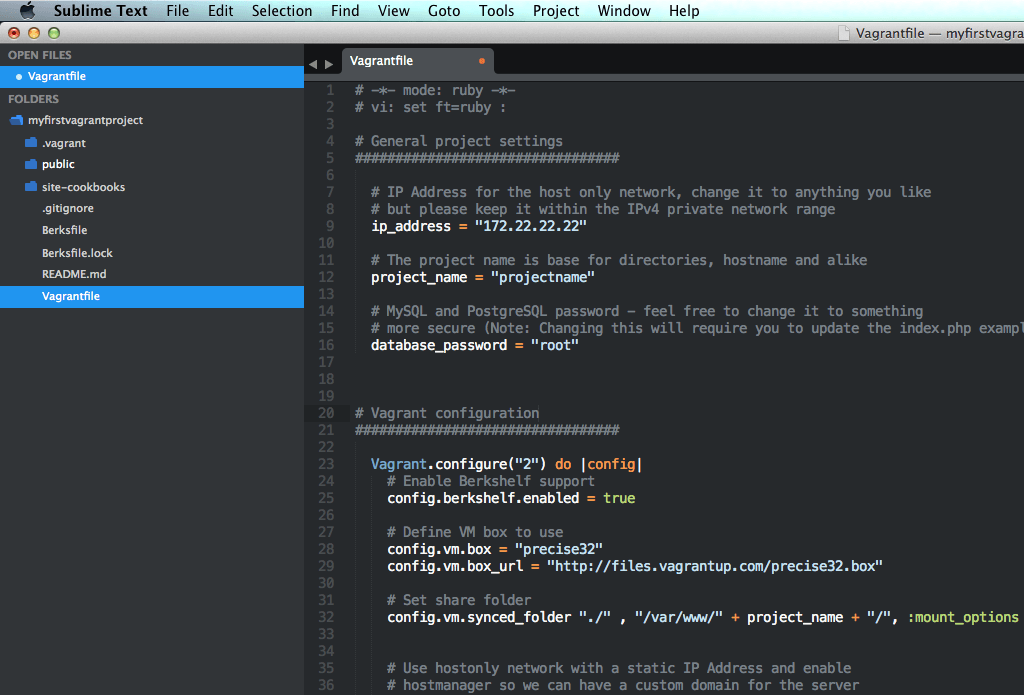
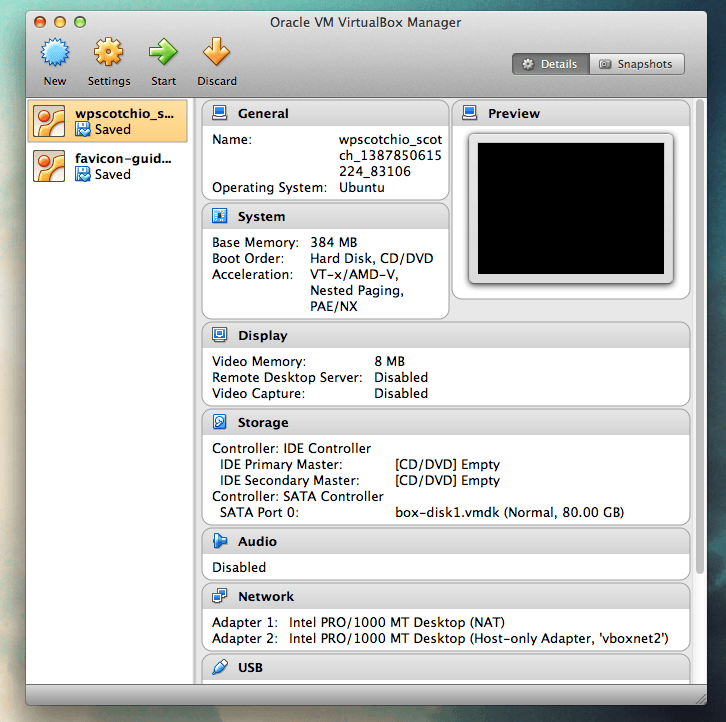
Clone a Vagrant LAMP StackYou could build your own LAMP Stack and configurations, but for simplicity and the purpose of this tutorial, we’ll just be using an already built one by this awesome developer. I’ve forked and modified the repo to get it working with my version of Vagrant, Mavericks, and VirtualBox. Navigate to the folder you want your project to be at in your terminal and do: git clone https://github.com/scotch-io/Vagrant-LAMP-Stack.git myfirstvagrantproject Next, navigate to the folder and start vagrant: cd myfirstvagrantproject vagrant up At this point Vagrant will start building a virtual environment based on the configuration file called “Vagrantfile”. If you want for future projects, you can go inside of here and set some useful config options that this stack has. The options I usually change are: vagrant plugin install vagrant-berkshelf vagrant plugin install vagrant-hostmanager vagrant plugin install vagrant-omnibus# IP Address for the host only network, change it to anything you like # but please keep it within the IPv4 private network range ip_address = "172.22.22.22" # The project name is base for directories # Will also be the hostname for your project (e.g.: http://projectname.local) project_name = "projectname" After Vagrant has successfully completed, open up your browser and navigate to http://projectname.local or 172.22.22.22 to connect to your local environment (note that the image URL below is not correct for this tutorial and from an older version): That’s it! You’re now up and running with Vagrant. To edit files and start developing, just navigate to the public folder and begin coding as you normally would. Any changes made on your computers public folder are automatically shared to the virtual environment. You can even open up VirtualBox to see the virtual environment that you and Vagrant just created. Here’s what mine looked like at the time of writing this: | 译者信息Clone a Vagrant LAMP Stack你完全可以构建自己的LAMP环境,但基于本教程的间接性,我们使用一套现成的环境. 我已经 做了一些修改,可以配合我的 Vagrant, Mavericks, 和VirtualBox来使用. 定位到工作目录键入下面命令: git clone https://github.com/scotch-io/Vagrant-LAMP-Stack.git myfirstvagrantproject 进入刚才的目录,启动 vagrant: cd myfirstvagrantproject vagrant up 这时候Vagrant会基于 “Vagrantfile”文件构建虚拟开发环境. 如果你还需要一些额外的配置,这个时候可以进行配置. 我一般会做如下操作: vagrant plugin install vagrant-berkshelf vagrant plugin install vagrant-hostmanager vagrant plugin install vagrant-omnibus# IP Address for the host only network, change it to anything you like # but please keep it within the IPv4 private network range ip_address = "172.22.22.22" # The project name is base for directories # Will also be the hostname for your project (e.g.: http://projectname.local) project_name = "projectname" Vagrant安装完成以后,从浏览器访问 http://projectname.local 或是172.22.22.22 会连接到你的工作环境(下面图片上的url是之前老版本的,请注意): 这就完事了!现在 Vagrant已经起来了. 进入公共目录下,就可以开始码字了. 任何公共文件夹上的更改都会同步到你的虚拟环境里. 也可以打开 VirtualBox查看刚刚创建的虚拟环境和vagrant. 下面截图是我写本文时候的: |